Wednesday, November 21, 2012
Park Day Nov 2012
Just a quick blurb. On Monday 11-19-2012, I ventured to a local park with my SCX10. Found a few good spots to crawl on. I'll get some pictures posted later, and will be putting together a video on it too.
Thursday, November 15, 2012
Tuesday, November 13, 2012
Return of the Micro Monster: the movie
Finally got both parts of the movie completed and uploaded. Hope you like them.
I ended up with a lot of footage on this little run. Again this was another iPhone production:
As I was cleaning up the files from my iPhone, I got an idea for a little short on this film. I'm going to not give any details until it is together and uploaded.
Where will the Micro Monster strike next?
Part 1:
Part 2:
I ended up with a lot of footage on this little run. Again this was another iPhone production:
- FiLMiC Pro to capture the video.
- iMovie for editing.
- Strip Designer for the title page.
- Acton Movie FX for the special effects shots.
- iPhone built in screen shot function to grab stills from video.
- Music from the Resident Evil live action movie soundtrack, ID Software's Quake 2 soundtrack, and from a couple of Film Riot episodes.
- Wi-Fi connected to upload to YouTube.
As I was cleaning up the files from my iPhone, I got an idea for a little short on this film. I'm going to not give any details until it is together and uploaded.
Where will the Micro Monster strike next?
Saturday, November 10, 2012
Return of the Micro Crawler
I have started up another video project on my Losi Micro Rock Crawler. Once again this will be another iPhone only production.

Movie Poster

Trailer:
This movie will actually be a 2 part production as I want to keep the video sizes down. Production details will accompany the part 1 release.
Stay tuned!
SCX10 new radio
I just received in a new radio that I will be adding to my SCX10, the Futaba 4PL 2.4GHz pistol radio:
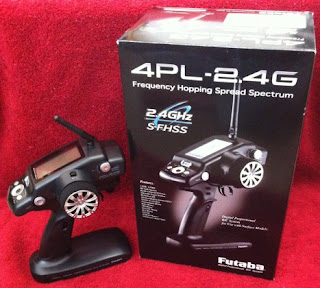 This is their lower end, 4 channel, 2.4GHz, pistol grip transmitter. It is a nice and lightweight radio, using only 4 AA batteries for power. The 3-channel system I have it in now is good, but it does not have a 3 position switch for the 3rd channel. Why would I need a 3-pos switch? Well I plan to pick up a scale, working winch from RC4WD. They are some nice looking winches, and a 3-pos switch would allow for easy operation. And you can't have a scale off-road truck with out a working winch, can you? And since this is a 4 channel radio that also just happens to have a 4WS mix, I have a new mod project on my 2013 list to give my SCX10 4WS capability. Now I know there aren't many full size 4WD trucks, but since I do have the Proline Helios body (aka the Halo Warthog) having both a winch and 4WS will make for some great scale times.
Looks like I might have to postpone getting the awesome scale looking Axial Wraith Rock Racer kit.
Once I have performed the radio transplant, I'll work on getting another SCX10 video going.
Got Rocks, will crawl.

Looks like I might have to postpone getting the awesome scale looking Axial Wraith Rock Racer kit.
Once I have performed the radio transplant, I'll work on getting another SCX10 video going.
Got Rocks, will crawl.
Creeper and 4WS
I decided to finally do some searching on how to use the wonderful Spektrum DX6i radio to setup for 4WS.

Currently, I have each steering servo on a separate channel. This is good as it allows me to independently control front and rear steering. the downside is that if I want to do crab crawl or tight turning, I have to do some additional focus on how to move the sticks. My searching brought me to this post on rccrawler.com. The poster goes through how to setup the available custom mixing to allow changing to and from the crab and tight steering. this setup allows for 2 of the switches to be configures to turn on and off the 2 additional modes, while still allowing full independent control of the steering servos. Now this poster's setup is slightly different than what I want, and I was able to easily make modifications to the setup to suit how I control my crawler. And I even documented step-by-step how I did my setup:

Currently, I have each steering servo on a separate channel. This is good as it allows me to independently control front and rear steering. the downside is that if I want to do crab crawl or tight turning, I have to do some additional focus on how to move the sticks. My searching brought me to this post on rccrawler.com. The poster goes through how to setup the available custom mixing to allow changing to and from the crab and tight steering. this setup allows for 2 of the switches to be configures to turn on and off the 2 additional modes, while still allowing full independent control of the steering servos. Now this poster's setup is slightly different than what I want, and I was able to easily make modifications to the setup to suit how I control my crawler. And I even documented step-by-step how I did my setup:
Spektrum DX6i setup for Venom Creeper
with 4WS:
Radio mode: 2
Throttle: DIG
Rudder: Front Steering
Aileron: Rear Steering
Elevator: Throttle
Gear: Remote Diff locker
Flap: Lights
- Turn on your radio
- Verify that you have correct model selected.
- Click the scroll wheel to enter settings mode.
- Move scroll wheel until the Mix 1 is highlighted.
- Click the scroll wheel, now you'll see the mix screen.
- Configure MIX 1 as follows:
- Scroll to INH, click scroll wheel.
- Scroll to change to ACT, click scroll wheel.
- Scroll to first selection (default value THRO), click scroll wheel.
- Scroll to RUDD, click scroll wheel.
- Scroll to next selection (default value THRO), click scroll wheel.
- Scroll to AILE, click scroll wheel.
- Scroll to 4th selection (RATE: L value), click scroll wheel.
- Scroll to +100 value, click scroll wheel.
- Scroll to 5th selection (RATE: R value), click scroll wheel.
- Scroll to +100 value, click scroll wheel.
- Scroll to 6th selection (SW: default value ON) , click scroll wheel.
- Scroll to ELE D/R, click scroll wheel.
- Scroll to 7th selection (TRIM: default value INH), click scroll wheel.
- Scroll to ACT, click scroll wheel.
- Scroll to LIST, click scroll wheel to exit MIX 1 setup.
- Back at ADJUST LIST menu, scroll wheel to MIX 2, and click scroll wheel.
- Configure MIX 2 as follows:
- Scroll to INH, click scroll wheel.
- Scroll to change to ACT, click scroll wheel.
- Scroll to first selection (default value THRO), click scroll wheel.
- Scroll to RUDD, click scroll wheel.
- Scroll to next selection (default value THRO), click scroll wheel.
- Scroll to AILE, click scroll wheel.
- Scroll to 4th selection (RATE: L value), click scroll wheel.
- Scroll to -100 value, click scroll wheel.
- Scroll to 5th selection (RATE: R value), click scroll wheel.
- Scroll to -100 value, click scroll wheel.
- Scroll to 6th selection (SW: default value ON) , click scroll wheel.
- Scroll to AIL D/R, click scroll wheel.
- Scroll to 7th selection (TRIM: default value INH), click scroll wheel.
- Scroll to ACT, click scroll wheel.
- Scroll to LIST, click scroll wheel to exit MIX 1 setup.
- Back at ADJUST LIST menu, scroll to Main, and click scroll wheel to exit.
Wednesday, October 24, 2012
Venom Creeper video
Finally! I got my first video of the Venom Creeper done and uploaded. No trailer for this one. When going over the footage, I didn't have the proper shots suggested for the iMovie trailer templates. But first....

And now for the feature film:
Venom Creeper setup:
This time around I went back to iMovie for iPhone and used one of the themes there. The title segments are OK but could use more adjustments for font formatting and possibly location. For the actual title and end credit segments, I used still photos enhanced with Strip Designer. For the end shot, I used the fun Action Movie FX app. I'm still having fun filming and editing with my iPhone.
I didn't get it uploaded earlier, but here is a movie poster for the SCX10 Trail Honcho:

Happy Crawling!

And now for the feature film:
Venom Creeper setup:
- Venom Dig Unit using stock Venom servo
- Venom Remote Dif Lockers using stock Venom servos
- TowerPro MG946R servos for 4WS
- Novak Eiger ESC
- Axial 55t brushed motor
- Spektrum DX6i radio
- Venom Group 5000mAh NiMH 7.2v battery
This time around I went back to iMovie for iPhone and used one of the themes there. The title segments are OK but could use more adjustments for font formatting and possibly location. For the actual title and end credit segments, I used still photos enhanced with Strip Designer. For the end shot, I used the fun Action Movie FX app. I'm still having fun filming and editing with my iPhone.
I didn't get it uploaded earlier, but here is a movie poster for the SCX10 Trail Honcho:

Happy Crawling!
Saturday, October 13, 2012
Honcho mods
Well maybe not really mods, but more like add-ons.
I finally started and completed a mod idea that I found when researching the SCX10 kit. It basically adds some body panels to the rear section, and some more lights. Here is the YouTube video that inspired my mod. I actually have to give credit to RCBitz for helping me make the decision to purchase the SCX10 Trail Honcho. He has a decent step-by-step assembly video series, and that starts here.
In addition to the mod, I also add some interior details: a pair of guns.


Not bad for amateur work. Now I just need to get some working lights.
Wednesday, August 8, 2012
The Creeper Monster
Finally an update to the Creeper. It's been awhile and some progress has been made.
The remote diff lock mods didn't work out too well. The mounting just didn't work, and trying to operate them on different channels was not working out either. So I got some new remote diff lock kits and got them mounted in the manufacturer's recommended location.
The shock rebuilds when better than I expected. I only had a slight difficulty on 1. So the shocks are back to factory default, but with a slightly heavier weight oil. I didn't have enough of the stock kit oil and grabbed the left over from the SCX10 kit.
I also got in some new electronics. Two new servos with more torque for steering. Yes, two to have 4 wheel steering setup. A new Novak ESC that is designed for crawling. A new higher capacity battery for longer run times. Some lights for the Creeper. Picked up a basic set with 12 lights and 4 modes for a great price. Let's just say that the Creeper will crawl and provide a party atmosphere.
Some non electronic upgrades include an upgraded drive line with improved joints. The original setup uses grub screws to hold a yoke pin into a yoke cylinder, and lock tight is to be used on the screws. Unfortunately this makes for a very difficult and frustrating rebuild/disassemble process. The upgrade uses collars to hold in the pins, and the center drive line collars use larger grub screw to stop slipping. This ends up giving some strength on the joints and makes for a much easier rebuild. Also got a new gray servo plate for the rear servo to match the front. A new green steering linkage set for the rear, again to match the front. Some Axial light buckets for easy light mounting. And a new body to top it all off with.
I need to get new connector style on the motor for use with the new ESC. So until then, I'll continue with the old reliable Novak Rooster. I got all the upgrade parts mounted, and lights installed on the body. Need to attach a few lights to the steering servos. Now all the wiring needs to be cleaned up.
Hopefully this means that I'll get it up and running soon and should have some new videos too.
Saturday, July 14, 2012
Utah Crawl
Well, I am finally deciding to upload the Utah crawl video. It's OK. I actually prefer shooting the day light runs, but I did enjoy the evening crawling.
Needs more lights. And some other scale details would be nice. We'll see how things go.
Needs more lights. And some other scale details would be nice. We'll see how things go.
Tuesday, June 5, 2012
Helios - Mission 2: Survival
Well I had some extra footage that didn't make it or fit in with the "Mission: Patrol" video. I went through the video apps I have, and decided to try Silent Film Director and come up with the follow:
Putting this one together was almost as fun as running the crawler. Now I'm going to have to make sure to get extra shots during my crawls to come up with more Silent Film videos. Maybe even use the Silent Film format as my "extras".
So it looks like I need to get moving on the Venom Creeper.
Putting this one together was almost as fun as running the crawler. Now I'm going to have to make sure to get extra shots during my crawls to come up with more Silent Film videos. Maybe even use the Silent Film format as my "extras".
So it looks like I need to get moving on the Venom Creeper.
Sunday, June 3, 2012
My first 2-for.
At uploading crawling videos that is. While monitoring the smoking grill, I decided to catch up on some video processing.
First up is the full length short film for Helios - Mission: Patrol:
This is the first time of using FiLMiC Pro. I found that I need to lock the focus. Having auto focus doesn't turn out too well. I also need to verify that recording is on or off. When hitting the first big rock, there was actually supposed to be more footage just before. Unfortunately I ended up NOT recording the driving, and recorded the repositioning of the camera. And I totally goofed up on paying attention to the shots. I ended up with full size vehicles again. Oh well. Lessons learned for the next adventure. This was done in iMovie, so sorry about the music. iMovie doesn't have much of a selection for music, and I am not brave enough to use my music from iTunes.
I also ran into an issue trying to upload from the iPhone. for some reason it kept failing. iMovie never gave a clear reason why, but looking at the length I'm guess the phone couldn't handle the upload. And yes it was connected to Wi-Fi.
Up next is a trailer for the Utah night crawling:
This time I locked the auto focus. but with the setting Sun, I had a challenge with the lighting. I didn't use the iPhone's flash at all as I didn't want to much extra light or light from a weird angle. And I wanted the truck lights to show up good. Also, the full size vehicles were on my watch list. There shouldn't be any this time, but I'll know once I start diving into the full film. This was a blast filming. As I do more shooting and crawling, hopefully the videos will get better.
Off to crawl more!
First up is the full length short film for Helios - Mission: Patrol:
I also ran into an issue trying to upload from the iPhone. for some reason it kept failing. iMovie never gave a clear reason why, but looking at the length I'm guess the phone couldn't handle the upload. And yes it was connected to Wi-Fi.
Up next is a trailer for the Utah night crawling:
Off to crawl more!
Thursday, May 31, 2012
Utah Crawling 2012
This past weekend we went up to Utah, around the St George area. We just spent a relaxing weekend. I got in some late day crawling. Pretty much just as the Sun was going down. I ran the SCX10 Trail Honcho with all lights on, and got some video too. The start had good lighting, but later as it got dark not so much. This would be a down side to the iPhone being used as a video camera: not much low light recording without using the flash. The flash/light was not used, as I wanted to try to make use of the surrounding light and get the truck lights to show up good. The movie trailer is in the works currently. I also did some crawling not captured on video. Shooting video while solo crawling can be a little challenging. Setting up the camera in the right spot at the right angle to get the shot I want can reduce the time of just crawling all over.
While not crawling, I did take some time to work on the Helios crawl movie. I have found that having a bigger screen for iMovie editing would help greatly (maybe I can help sway Santa with a six-pack). It's almost ready for upload.
The Creeper is in the "garage". Finally started the remote diff lock mods. For those not familiar, the Venom Creeper has lockable diffs and Venom (err...now known as Atomik RC for their RC vehicles) has an add-on kit to setup the diffs with remote lock/unlock abilities using a 3+ channel transmitter. The mod that I am working on is relocating the servers from the stock mounting position on the chassis to a position on the axles. Hopefully I can get this completed soon and try it out. I am also going to re-setup the shocks back to stock setup. Ooh! I hates messin' with shocks! Without the anti-roll springs the body tends to tilt, a lot. So much that a pinball machine would just fall apart from looking at it. The last run with it at the in-laws, father-in-law asked why it was tilted. Well, this is the technical reason why.
That's all for now.
Saturday, May 19, 2012
Sunday, May 6, 2012
More Crawling
Been a little lazy on blogging about crawling. The past few weekend visits to the in-laws, I have taken over both the Creeper and the SCX10 to do some crawling in the back yard. The nephews love watching them go, but I think these are a little slow for their tastes. They prefer the fast RC's and trying to out run them. But they did still have fun. They would be tunnels for the trucks to drive under them. Have me chase them with the trucks. With these trucks running 55T brushed motors, the boys have more than enough speed to run away.
Of the trucks I do have, I seem to have more fun with the SCX10. It was able to get over a large rock while the Creeper could not. The Creeper is a competition crawler, and when setup correctly it will out crawler a scaler any day. So I must have the setup wrong with the Creeper. Oh well, someday I will get it right.
I have put on a new body for the SCX10. This is a discontinued Pro-Line Racing Helios body which very closely resembles the Halo Warthog. To bad this is discontinued as it makes a great body for the SCX10.

As such, I am going to make some mods that I can to this body. Mainly I will be trying to add some lights, and maybe a few scale details such as tools. I may even try to work on some sort of interior too.
I just did some crawling with it this morning. It ran good with the new(ish) body. And this run I did get some video and a few pictures. I will actually try to do a trailer first, then the full movie short.
For the video capture, I used a new app FiLMiC Pro. Using the app was pretty easy. It has separate reticules for focus and white balance. The white balance reticule came in handy with the outdoor shooting. If there was back light, I could move the white balance around until I got the lighting I liked. We'll see how all the video looks when I get working on the new short. So far, though, I am impressed with this app. If you like shooting video with your iPhone, I would recommend this app over the default built in video camera app just for the white balance adjust-ability.
Sunday, March 18, 2012
McRC - the trailer
Well I finally made a trailer for my Micro Rock Crawler video. Yes I know the trailer is supposed to come out before the actual film. I wasn't planning on really doing trailers, but iMovie for iOS updated a little while ago to include a trailer maker (not sure what they actually call it). So with the update, I had to try it out. There are actually templates to use. You choose the style or theme, change the text, and insert the clips to use. It's actually pretty easy. Now, for the trailer.
Saturday, February 18, 2012
Micro Crawler Crawl...
Well I finally got my first Losi Micro Rock Crawler video done and uploaded. This was done mostly on the iPhone again. I say mostly as I had to transfer the video file to the computer to actually upload it to YouTube. But all shots and editing were done on iPhone. This time I tried a different video editing app: Splice. Go to my other blog where I will give my opinions on using this one.
I have been having fun with this little monster. Trying to come up with new obstacles and track layouts is half the fun. The other half, or coarse, actually driving and navigating them. The only sad thing is that Losi has discontinued this particular model of their Micro Rock Crawler. I would love to get another one to have fun with my nephews creating new tracks and then driving them. The crawler did have several tumbles. I will work on and upload an "outtakes" video, and get a count of them.
Well, on to the show...
I know, another long R/C video. I'll have to work on trying to get more "action" in if I'm going to keep making them like this.
Tuesday, January 31, 2012
Crawler Update
The Micro Crawler movie is slow going. I have the video shot and ready to use, I just need to get busy on it. One thing I can show is a movie poster:

On another project, I am working on getting my Venom Creeper setup with some extra functions. While disassembling, I came across some stripped set screws (or grub screws). So far I have not found an easy removal process. Plan B is to use my Dremel with a metal-cutting wheel. This ought to be interesting, since it's my first metal work (or should I say hack). I also grabbed some dust masks and safety glasses. We'll see how things go this Saturday.
Until next update, Nanu Nanu!

(this film has not yet been rated)
On another project, I am working on getting my Venom Creeper setup with some extra functions. While disassembling, I came across some stripped set screws (or grub screws). So far I have not found an easy removal process. Plan B is to use my Dremel with a metal-cutting wheel. This ought to be interesting, since it's my first metal work (or should I say hack). I also grabbed some dust masks and safety glasses. We'll see how things go this Saturday.
Until next update, Nanu Nanu!
Tuesday, January 17, 2012
Upcoming project...
I am working on a new video involving my Losi Micro Crawler. It's on an indoor coarse in the computer room, but no computer crawling...yet. And yes it is a computer room, not a man-cave. My wife does use the room too. Shooting the video was a little odd using the iPhone since I don't have any sort of tripod. But that's a challenge for another day. The run was fun. I may post some previews later, if I can find any preview worthy shots.
Subscribe to:
Comments (Atom)